How to Stay Safe Cycling at Night
Cycling at night safety comes down to three things: lights, visibility, and smart route choices. Here's how to ride confidently after dark.
Riding after dark is genuinely enjoyable once you sort out the basics. Roads are quieter, temperatures are cooler in summer, and there's something satisfying about the solitude. The real challenge is visibility: drivers have less time to react, and you have less time to spot hazards. Get the lighting and gear right and most of the risk disappears fast.
Your Lights Are Not Optional
In most places, riding without lights after dark is illegal. More practically, it's how collisions happen. You need two lights minimum: a white front and a red rear.
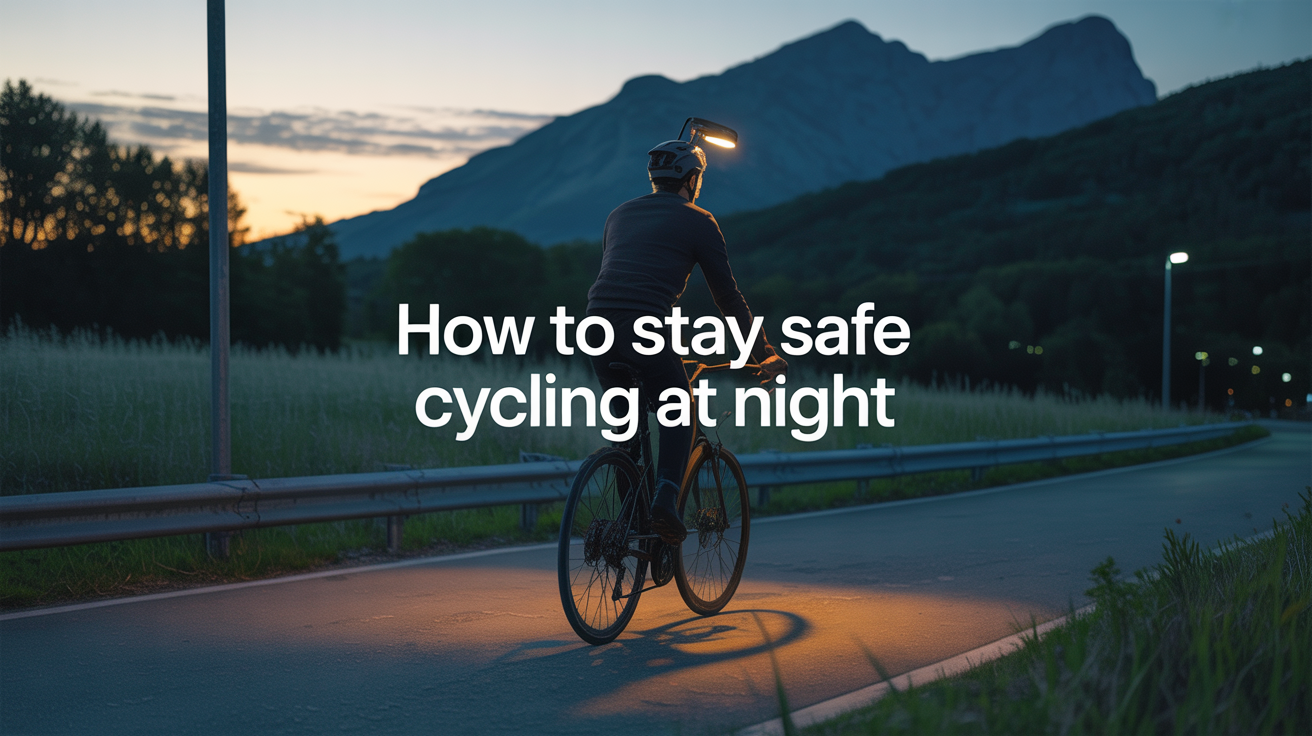
Front Lights
A 400-lumen front light is a reasonable starting point for roads with streetlights. On unlit lanes or bike paths, go higher, 800 to 1,000 lumens, so you can actually see potholes and debris rather than just be seen yourself. Most commuter lights have a steady and a flashing mode. Steady is better for seeing the road ahead; flashing is more attention-grabbing to drivers. Using both simultaneously (if your light supports it) covers both jobs.
Mount the front light on the handlebars pointed slightly downward, not straight ahead into oncoming faces. A light angled too high blinds cyclists coming toward you on shared paths and annoys drivers rather than helping them place you.
Rear Lights
A flashing red rear light is the single most important piece of safety kit for riding a bike in the dark. Drivers behind you need to see you from 100 to 150 metres away to have time to react at speed. A 50-lumen rear flash does this job well; 100 lumens is better. Mount it on the seatpost or seatstay, not buried under a bag where it points at the ground.
Carry a spare rear light or keep a USB-charged backup in your bag. Batteries die mid-ride more often than you'd expect.
Helmet Lights
A secondary light mounted on your helmet adds meaningful safety on routes with junctions and driveways. Because your head turns to check traffic, a helmet light sweeps in the direction you're looking, it catches a driver's eye right as you're checking whether they've seen you. Not essential, but worth considering if you commute regularly after dark.
Visibility Beyond Lights
Lights make you visible from the front and rear. High-visibility clothing and reflective gear handle the angles in between, particularly when headlights hit you from the side at junctions.
A reflective vest or jacket is the simplest upgrade. Even a plain neon yellow jacket with no reflective strips is easy for drivers to spot under streetlights. Add reflective ankle bands if you wear dark trousers, the motion of your pedalling legs catches eyes faster than a static vest.
Bike reflectors also matter. Most bikes come with spoke reflectors from the factory; don't remove them. Pedal reflectors are particularly effective because the circular motion creates an unmistakable cycling silhouette that drivers recognise immediately.
Here's a quick rundown of visibility options by priority:
| Item | Benefit | Priority |
|---|---|---|
| Rear flashing light | Seen from behind at distance | Essential |
| Front white light | See the road + seen head-on | Essential |
| Reflective vest or jacket | Side visibility at junctions | High |
| Ankle/leg reflectors | Moving reflectors, very eye-catching | High |
| Helmet light | Sweeps toward where you look | Moderate |
| Spoke reflectors | 360° coverage at intersections | Low (keep if present) |
Route Planning and Road Choice
The safest night ride often isn't the fastest one. Roads that work well in daylight can feel very different after dark if the lighting is poor or traffic is fast.
Before heading out, it's worth spending five minutes on route planning. Look for roads with streetlights rather than unlit country lanes. Cycle paths and quiet residential streets let you keep a steadier pace without watching for fast-moving traffic. If you're not sure which roads are busy at night, check a couple of options on a mapping app and pick the one with more turns and calmer speed limits over the one with fewer turns and 60 mph zones.
Avoid roads with no verge or path on your left. At night, if a vehicle passes closely, you need somewhere to go. A grass verge is better than nothing.
Check your route for known hazards before you leave: roadworks, temporary traffic lights, flooded dips. Hazards you'd spot easily in daylight disappear completely in darkness or become visible only at the last second.
Adjusting Your Riding Style
The same road requires a different approach at midnight compared to midday.
Slow down for unknowns. Your light illuminates maybe 10 to 15 metres ahead at typical commuting speeds. Potholes, drain covers, and gravel don't announce themselves. Keep your speed to a level where you can stop or steer within your lit zone.
Ride further out from the kerb. At night, close overtakes are more dangerous because drivers misjudge gaps more easily. Taking a more central position in the lane on narrow roads forces drivers to make a real overtaking decision rather than squeezing past.
Use your ears. Without the visual context of daylight, sound becomes a useful cue. A car revving hard behind you, an engine speeding up at a junction, a door about to open, you'll hear many of these before you see them. Keep earphones out or use only one at very low volume.
Signal earlier and bigger. Arm signals at night need to be deliberate and held for longer. A driver 50 metres back at speed has less time to process what you're doing, so give them more warning.
Getting Your Bike Ready for Night Rides
A mechanical failure that's a mild inconvenience in daylight becomes a much bigger problem at 11pm on a quiet road. Running through a few checks before you go saves a lot of trouble.
- Tyres: Check pressure and inspect for any embedded glass or cuts. A slow puncture that takes hours to develop in daylight becomes a problem faster in the cold.
- Brakes: Squeeze both levers and make sure there's firm resistance well before the lever hits the bar. Wet rims in autumn reduce braking power significantly.
- Lights: Turn them on and check the charge level before leaving, not halfway through the ride.
- Gears: A skipping chain or a gear that won't shift cleanly is more stressful to deal with at night. If anything felt rough on your last ride, sort it before this one.
If you're new to commuting and want to build out your setup properly, take a look at how to start bike commuting without the stress. The gear list there applies to night riding too, with the addition of lights as a non-negotiable.
Carrying What You Need
A flat tyre at night is fixable, but you need to be prepared. A small saddlebag with a spare inner tube, tyre levers, and a mini pump is enough. If you're less confident with repairs, a CO2 inflator is faster and easier than a pump in cold or dark conditions.
Keep your phone charged. Not just for directions but because it's your most practical way to call for help if something goes wrong that you can't fix. A small power bank weighs almost nothing and means your navigation app can run the whole commute without draining the battery.
For longer night rides where you're carrying more, the guidance on how to carry stuff on your bike covers bag options well. Panniers are generally better than backpacks after dark because they keep your back free for ventilation and don't shift your centre of gravity when you need to react quickly.
FAQ
Do I really need a front light or will a reflector do?
A front reflector alone is not enough. Reflectors only work when light from another source hits them, which means a driver behind you might see your rear reflector, but no one sees a passive front reflector until their headlights reach you, and at that point you're already very close. A powered white front light is required by law in most countries after dark and is genuinely necessary for safety.
How long do bike lights last on a single charge?
It varies a lot by model and brightness setting. Most commuter lights last 2 to 6 hours on their main setting, and considerably longer on a flashing or low mode. Check your specific light's specs before a longer ride. A good habit is to charge both lights after every night ride so they're always full.
Is it safer to ride on the pavement at night if the road feels too fast?
In most places, riding on the pavement (sidewalk) is either illegal or technically permitted but not recommended. Pedestrians, low kerbs, and parked bins are harder to see at night, and junctions are more dangerous because drivers aren't looking for cyclists crossing from the pavement. If a road feels genuinely too fast and busy, find a quieter alternative route rather than using the pavement.
What should I wear if I don't have cycling-specific kit?
Any bright or white clothing helps. A high-vis vest over whatever you're wearing costs very little and is the fastest upgrade you can make. Dark jeans and a black jacket make you almost invisible to drivers, even with lights. Reflective ankle straps are the next best addition, since the movement of your legs is what catches peripheral vision first.
Is night cycling safe for beginners?
Yes, with the right preparation. Start on routes you already know in daylight, keep your speed moderate, and make sure your lights are good. A familiar 20-minute commute at night is far less challenging than an unfamiliar 10-mile route. Build your confidence on known roads first, and you'll find that riding after dark quickly becomes routine.